How To Design A Reach In Wardrobe
ClosetMaid is so versatile, you can use it in almost room in the home. However wardrobes / closet systems are still the most popular uses by far.
At Organise My Home, we offer a fantastic range of packages that you can choose from. Select the size nearest to your available space and trim off any excess to suit your measurements exactly! We also offer a free design service, so you can let us design your perfect closet. However, reach in wardrobes are very easy to design yourself and you can order each shelf and bracket etc. separately to achieve the ultimate organised wardrobe!
Here, we have given you a step by step guide to show just how easy it is to design your own closet system using the ClosetMaid Shelf & Rod range. At the end, we've even included a shopping list, so if you like our design you can purchase it for yourself!
We hope this tutorial will go some way in showing just how simple it is to create and install your own custom closet system. But if you have any questions, feel free to contact us on 01622 872 006.
Step one - Measure your space
This tutorial illustrates how to design a reach in wardrobe system. Reach in wardrobes refer to any storage space that will use one main wall to mount the shelving to. If side / end walls are available, ClosetMaid shelving will also be supported at each end on these walls as well as the back wall. However if you don't have one or either side / end wall, it's not a problem. We have hardware to create an 'open end' / floating shelf design where all fixings go onto the back wall.
To measure, run a tape measure across the back wall from side to side to determine the width of the space you'd like to use. Bear in mind that if you have any obstacles or a door etc. that opens onto this space, your design needs to allow enough room for this.
Also make a note of the internal depth of your space (measurement of side / end walls). This will be important to determine what will reasonably fit in your space. Generally we say that a reach in closet should be at least 51cm (20") and ideally 61cm (24") deep.
Make sure that you also measure the height of your closet. This too will be important to work out what will reasonably fit in your space. If you plan to include two tier hanging space, you will need a minimum ceiling height of 216cm (85").
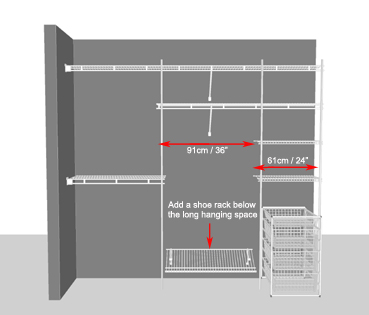
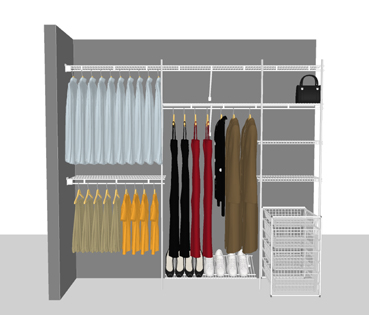
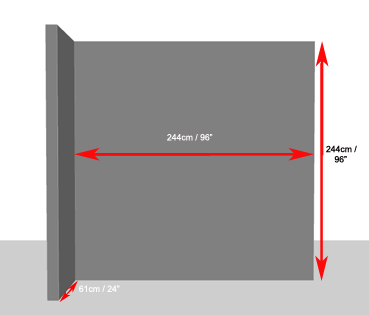
For the purpose of this tutorial, our reach in closet is 244cm / 96" Wide x 244cm / 96" High x 61cm / 24" Deep.
Some people have sloping ceilings to contend with, and if you're one of them, note that it's not recommended to fit shelving to the sloping ceiling, but instead work around it and maximise the rest of the storage space. If you need help, contact us for a custom design here.
Step two - Decide what you want to store
Our packages are great and offer you a budget friendly, simple way to get organised. However we recognise that people have different storage needs, which is why you may be designing your own closet system.
It's important that you consider what it is that you actually need to store in your reach in wardrobe, so that you ensure enough space for everything and won't find yourself still cramming things into a useless closet.
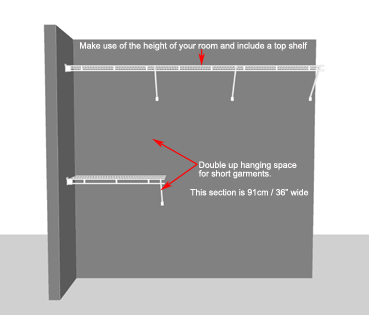
Take a look at what clothes you have and the space you already use to store your clothes. Measure how much room your short hanging items take up. If you need to allow extra room for short garments, factor this in. Divide this by two and make this the width of your two tier hanging space. Doubling up hanging for short garments is a really effective storage solution. You use less width but still have plenty of room for your items, whilst saving space for other storage areas!
Do you need hanging for coats / dresses etc? These tend to be longer than shirts & blouses etc. so include a dedicated long hanging space and keep organised!
Do you fold items? Lots of people don't, but perhaps you want to store bed linen or extra towels here? If so, make sure you include some shelving space.
Shoes! This is a big thing for a lot of our customers (and no, not just women!). You can create shoe racks using our ClosetMaid shelving simply turned upside down so that the front lip of the shelf acts as a shoe fence. When working out how many shoe racks you need, do a simple calculation based on these measurements. A typical pair of women's shoes are 20cm (8") wide, a typical pair of men's shoes are 25.4cm (10") wide. Shoe racks should be at least 25.4cm (10") apart when stacking two or more, you may want to allow extra space between shelves for tall boots / stilettos. Why not add shelf liner to stop high heeled shoes slipping through the gaps in the wire shelves?
Step three - Design your ideal closet!
Now that you know what you need to make room for, you can begin to design your closet.
Remember, doubling up short hanging space is a top tip! Create extra space for short hanging garments easily.
Include a full width top shelf and make use of the height of your room to give you storage space for flat and folded items that aren't needed regularly. I.e. Bed linen / luggage.
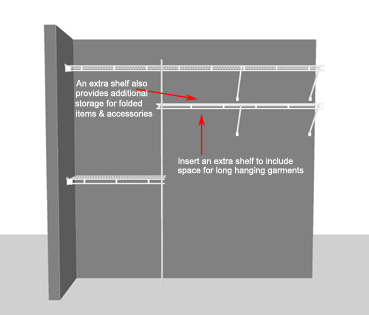
When adding long hanging space, if you have room, include an extra shelf. This way you get a little more room for flat and folded items.
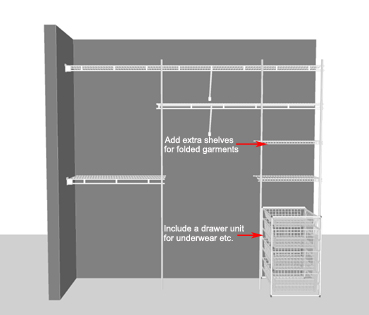
When creating space for folded garments and underwear etc. a simple way to do so is to allow for a half and half stack. This means, shelves on the top half, with drawers below. This way you keep similar items in one section, but you don't have to allow space for an entire shelf stack and a drawer system.
Shoe racks are best placed below long hanging items or in a section on their own to allow enough space, and not have garments draped over them. Here we've added a shoe rack below our long hanging section in the centre of the closet.
Step four - Your closet: shopping list
Now you have designed your closet, it's time to work out what parts you'll need!
Below we have given you an entire shopping list to create a Wall - Open, 244cm / 96" Wide reach in closet as shown above. The design uses our 12" (30.5cm) deep Shelf & Rod shelving, with regular shelves for the shelf stack and shoe rack.
| Part Number | Description | Quantity | Cost |
| 168 | Open end cap | 2 | £1.78 |
| 203 | Small Plastic end cap | 42 | £2.52 |
| 204 | Large Plastic end cap | 8 | £0.48 |
| 923 | Shoe Shelf support | 2 | £4.98 |
| 974 | Wall Bracket | 2 | £1.98 |
| 991 | Wall Clip | 30 | £9.00 |
| 1009 | Shelf Support Pole | 3 | £59.97 |
| 1164 | Shelf Support bracket (12" position) | 2 | £4.98 |
| 6205 | 7 Runner drawer frame & cross brace set | 1 | £44.99 |
| 6208 | Single depth wire drawer (4" / 8cm deep) | 1 | £12.49 |
| 6209 | Double depth wire drawer (7" / 17.8cm deep) | 3 | £41.97 |
| 6213 | Drawer stops | 2 | £3.98 |
| 6225 | White plastic moulded top | 1 | £24.99 |
| 47194 | 1.22m / 4' length of wire shelving
Cut one length to make 2 x 24" wide shelves
Trim other to make 1 x 36" wide shoe shelf | 2 | £19.98 |
| 73004 | 1.22m / 4' length of Shelf & Rod 30.5cm / 12" deep shelving
Trim to make 1 x 36" wide lower short hang shelf | 1 | £10.99 |
| 73006 | 1.83m / 6' length of Shelf & Rod 30.5cm / 12" deep shelving
Trim to make 1 x 62" wide long hang shelf | 1 | £16.99 |
| 73008 | 2.44m / 8' length of Shelf & Rod 30.5cm / 12" deep shelving
To make top shelf | 1 | £21.99 |
| Grand Total | £284.06 |
So there you have it!
How to design and plan your very own reach in wardrobe! We hope you've found our tutorial informative and useful. If you have any questions, please do not hesitate to contact us.
Click here to be taken to our Create your own Shelf & Rod layout section to find all the hardware mentioned above & more!