Create Closet Zones And Maintain Order In Your Wardrobe
16 April 2014 | Sally
Half the battle of being organised, is staying that way! If you're planning a new wardrobe or walk in closet, to help get you, your partner or maybe your children organised, make sure that your new storage system is organised in a way that will help you and your family STAY organised!
It sounds pretty obvious, but how often have you tidied up your bedroom, put everything away in the wardrobe, and then been looking for something...and found it in the back corner of the closet! Everything needs a place to call home and by organising your space so that those items you use frequently are kept to hand, and those items used seasonally can be put to one side, you're more likely to put everything back where it should be at the end of the day / week / when you tidy up. Creating zones in your wardrobe or walk in closet helps you do just that. Below we show you how to create zones and how that translates into an actual wardrobe design. We've used adult walk in closets and reach in wardrobes to show you, but once you see how we use the zoning system, you'll be able to apply the technique to any room in the home.
Zone your closet
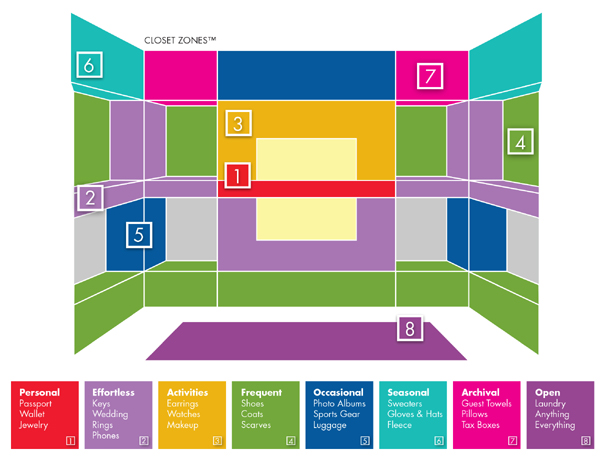
An orderly numbered system can work wonders in your wardrobe.
We've colour co-ordinated ours too for the purpose of this diagram.
- For a walk in closet, you have the luxury of space but space is a premium and you still need to maximise every inch! So when planning your closet, remember the 80/20 rule. Most people only wear 20% of their clothes, 80% of the time. These items must be made accessible, so keep them in reach and leave the seasonal or occasional pieces in the corner of the closet that won't get in the way.
Here you can see that we have labelled frequent use items in green, so keep your work clothes and regular lounge clothes in the places you'll be able to "grab and go" the most. In the corners, make use of the space by storing the occasional items here. That way you won't have to send out a search party every time you're looking for your favourite top!
- Personal items and everyday activity accessories should be kept at waist height. They're easier to see when you walk into your closet, easy to reach and easy to put away again. Things like make up, everyday jewellery, wallet, purse, etc. should all be kept on a shelf around waist height. If you can add a central shelf stack, this will not only provide you with the storage space required for these items, but it will also serve as a divider for different hanging sections, or perhaps a "his / her" side.
- Remember to accessorise! Don't underestimate the usefulness of small accessories, whether it be a tie / belt rack, drawers, shoe racks etc. all of these items can help create an organised closet which is easy to navigate, easy to maintain and easy to organise!
- Shoe's worn frequently, again should be kept in easy reach. If you organise your closet so that you place shoe racks below long hanging garments, or so that very short hanging garments hang on the bottom of a two tier section, you're able to squeeze a shoe rack below hanging storage so that you make the most of the vertical space too. Occasional shoes can be kept on top shelves so that they don't clutter the storage space needed for everyday items.
- If space is limited, consider hanging more garments. Sweaters, t-shirts, jeans etc. will take up less space if they're hung up on a hang rail rather than folded and trying to find enough space for drawers / additional shelves to store them on.
So how does this translate into an actual walk in closet?
Now that you've seen how to create the zones, its time to see what the finished article can look like.
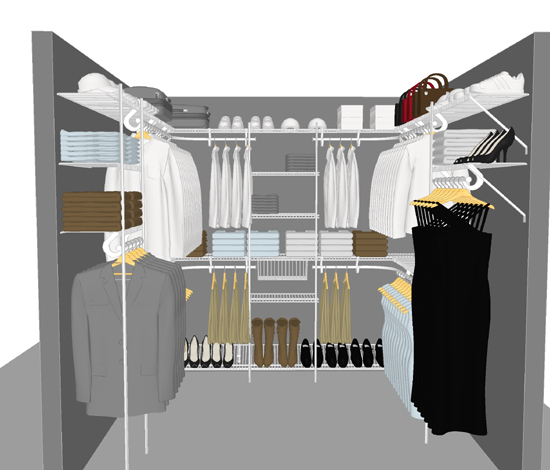
We've create a walk in closet which is easy to navigate and will store just about everything!
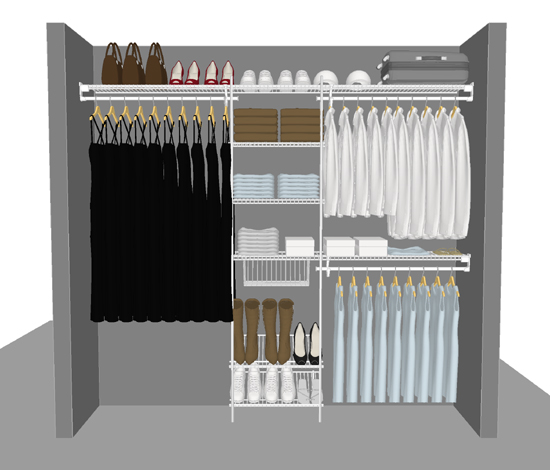
In the centre of the back wall, we have included a shelf stack with five shelves for flat and folded items as well as accessories. We've included a hanging basket too which will create a simple storage cubby for phones, wallets, keys etc.
To each side is a two tier hanging section. The lower rail has been organised to provide space for shorter items such as skirts and shorts so that a shoe rack can be inserted below. The upper rail provides storage for less frequently worn items with shelves above for seasonal items such as travel bags, occasional bags and shoes, hats etc.
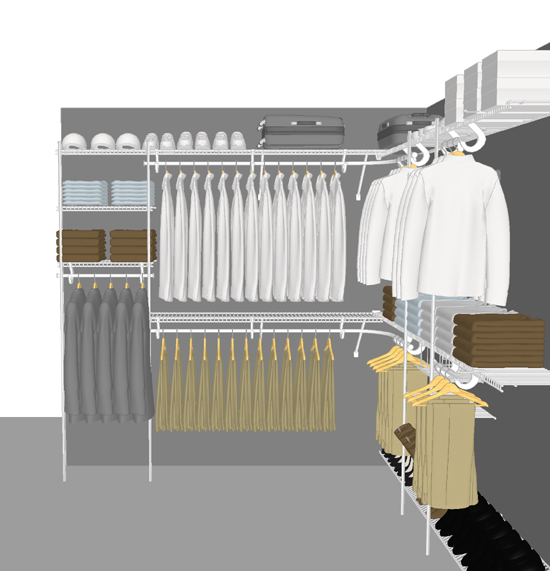
Along this wall we have created a section for items a little longer than regular shirts and t-shirts such as suit jackets / long skirts etc. These should be items that are worn weekly. I.e. work clothes or lounge wear. Above three shelves are included for folded items and accessories that again should be used regularly. The top shelf can then be reserved for items out of season, and items that are not used as frequently.
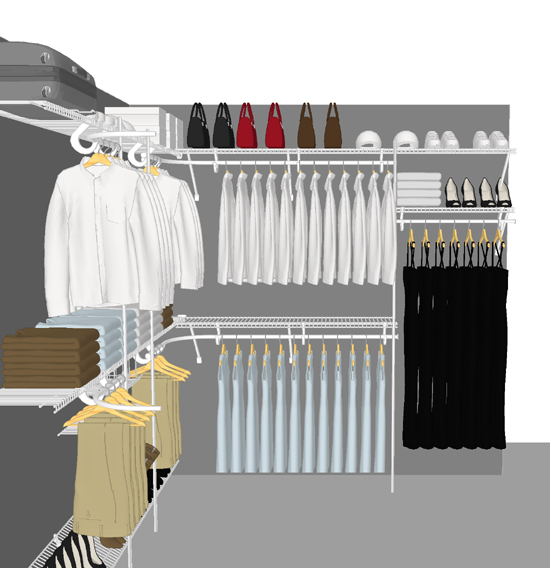
Along this wall we have included a long hanging section for dresses worn frequently or overcoats used day to day. Above an additional shelf provides storage for hand bags or shoes.
A two tier hanging section provides additional storage space for short garments.
Want to have a go at creating your own design? Take a look at our create your own ClosetMaid section here, where you'll find all the shelving and hardware required to organise your walk in closet. Alternatively, take a look at our walk in closet packages, click here to see the available range and choose a design and size nearest to your space.
This design is most similar to our walk in closet package #10, available in an 8' (2.44m) square space for just £405.
Want some help? Request a custom design here!
Get in the zone!
Of course, you can apply the same idea to a simple reach in wardrobe too;

Again, when designing your storage space, think about the items you use and need access to the most.
These should be kept, ideally at waist height and in the centre or to the right hand side of the closet.
Utilise all of the vertical wall space, by including extra shelving above the hanging sections that you can use to store occasional items, or boxed up seasonal items.
Use the corners of the wardrobe too. These are often neglected, especially if the doors across the front of the wardrobe don't open up the space fully. If you can't see it, the space doesn't get used to it's full potential. Don't store items you need regular access to here, but make sure you use it for those items that you wear on special occasions, or for shelving to store bags, sports gear or even keep sakes.
Below you can see how a ClosetMaid system can be used to create the ideal storage system;
A shelf stack in the centre is a great use of space, especially when you're trying to fit everything into your wardrobe. Shelves can be used for shoes, folded items, accessories, make up, bags etc.
This design then separates the long hanging and short hanging garments and with shelves above each hanging section too, you'll have space for extra folded and flat items as well as accessories and occasional items.
If you want to you can even keep a section below your long hanging space clear, useful for storing a vacuum, or heavy sports equipment, perhaps a laundry basket!
You can take a look at the rest of our reach in closet packages here, to get some inspiration about what suits you and your wardrobe space.
If you'd like to have a go at creating your very own wardrobe storage system, then click here!
We love reach in layout #9 for making the most of your available space, available from £165 its a steal!
Are you ready to zone out, and get organised in time for Easter? Let us know if this article helped you create order in your home or ask us a question below!


