Designing a walk in wardrobe with a sloping ceiling
19 September 2014 | Sally
Designing your own walk in wardrobe can be a daunting task, and when you throw sloping ceilings into the mix it becomes an even more challenging task!
Here, we wanted to show you how to make the most of your room when you have obstacles such as low / sloping ceilings to overcome. This hopefully will give you the confidence to plan your own space and order a ClosetMaid system to suit your requirements, just like a pro!
All you need to design your new walk in wardrobe, is a tape measure, a ruler, a piece of A4 paper, a pencil and an idea of how you'd like to use the space.
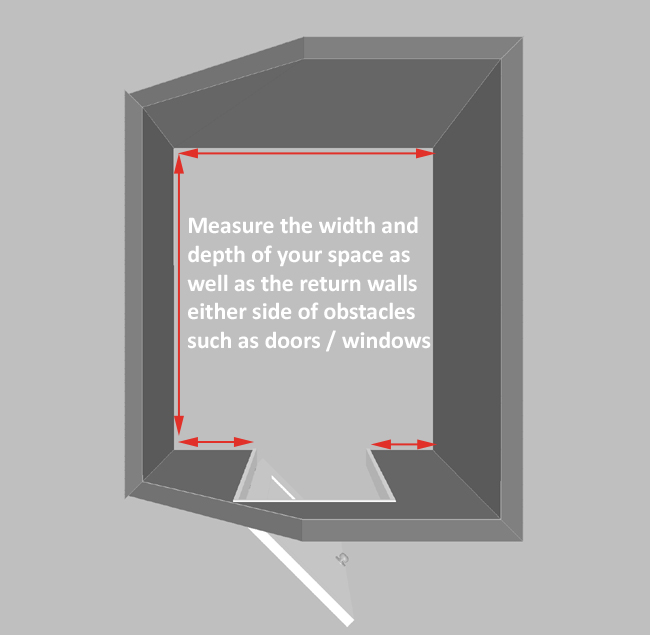
1) Start by measuring your space
In the interest of keeping it simple, quite obviously you need to know how much space you've got to work with. So start by measuring width and depth of your space, as well as any return walls either side of obstacles such as windows / doors. When working with a sloping ceiling, it's very important to get a good idea of the whole space, rather than just the bits you'd like to use as it can make a difference with fixings and position of shelves etc. even if you don't intend to place storage space in certain areas.
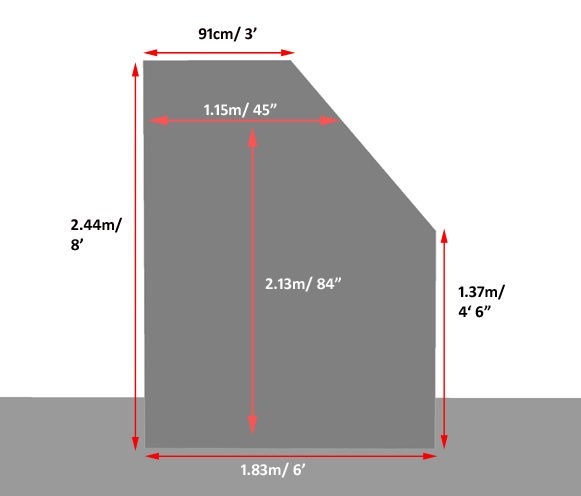
For the purpose of this tutorial, our walk in wardrobe is 1.83m/ 6' wide x 2.13m/ 7' deep. To the left of the door there is a return of 59cm/ 23". To the right of the door there is a return of 47cm/ 18.5".
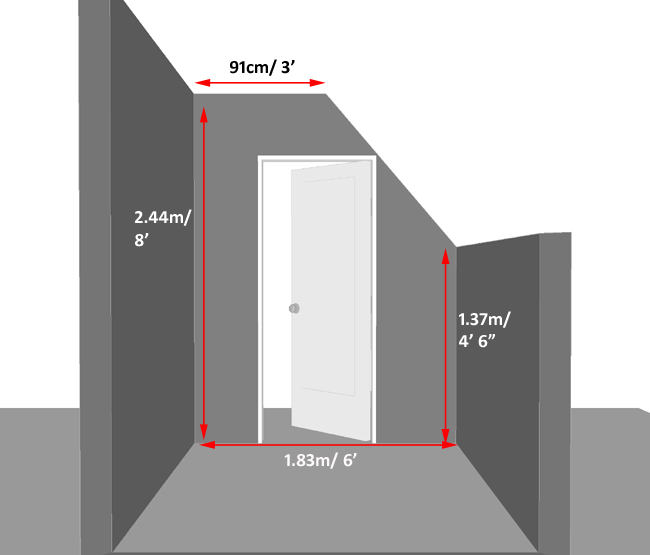
2) Next measure the height and slope of your room.
Now you need to work out what you can fit inside the room, whilst allowing for the slope. ClosetMaid shelving needs to be installed on flat/ perpendicular walls, so fixing to the actual slope is not possible. We can however design our closet to maximise the useable space.
So, take your tape measure and measure the tallest point of the room, and the lowest point of the room. You'll also need to measure the width of any flat area of the ceiling before the slope begins as shown in the below image.
For the purposes of this diagram, we've got a room which slopes to one side. Looking at the wall with the door on it, the flat area of ceiling is 91cm/ 3' wide before it begins to fall away. The highest point of the ceiling is 2.44m/ 8' and and the lowest point is 1.37m/ 4' 6" tall.
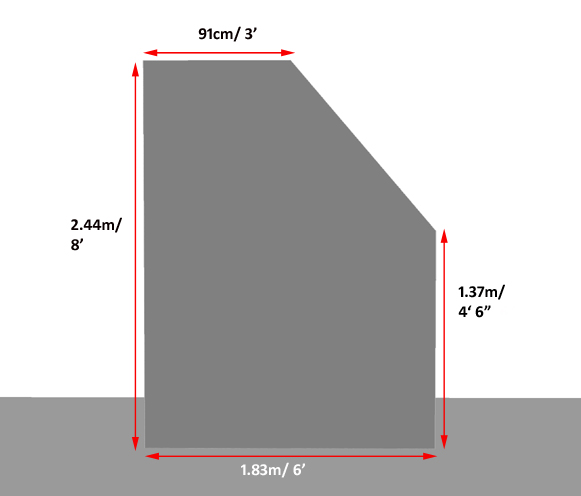
With your A4 piece of paper, pencil and your ruler, draw a 1D image of one of your walls where the slope intersects (i.e. in this example it would be the back wall / wall with the door in it as shown below).
Use a scale that will allow you to fit your drawing onto one sheet of paper and start by drawing the overall width of your room (this example it would be 1.83m). Drawing it to scale will help you work out the maximum widths of each shelf when you come to design your closet. Next draw the tallest side (this example would be 2.44m/ 8'), then draw the width of the flat ceiling area (this example would be 91cm/ 3'). Then you need to draw the shortest side (this example would be 1.37m/ 4' 6") and lastly draw a straight line indicating the slope between the end of the flat area of ceiling down to the lowest point of your closet. You'll end up with a 1D image of one wall like the one shown below which will act as a template when measuring where you would like to install shelving etc. so that you can work out the maximum widths of each section. As long as your room slopes in only one way, this will work for both sloping walls, you just have to invert it the drawing for each side accordingly.
3) Now it's time to create your storage checklist.
Who is the closet for? Is it for you? Do you share it with someone? What are each person(s) needs for storage in the walk in wardrobe? Once you know the answers to these questions, you should be able to form a list of the types of storage you need to include. For example, two tier hanging for short garments, pretty much everyone needs this. Most of us like to hang our clothes in a walk in wardrobe and the majority of our garments tend to be short hanging items such as shirts, blouses, tops, skirts, etc.
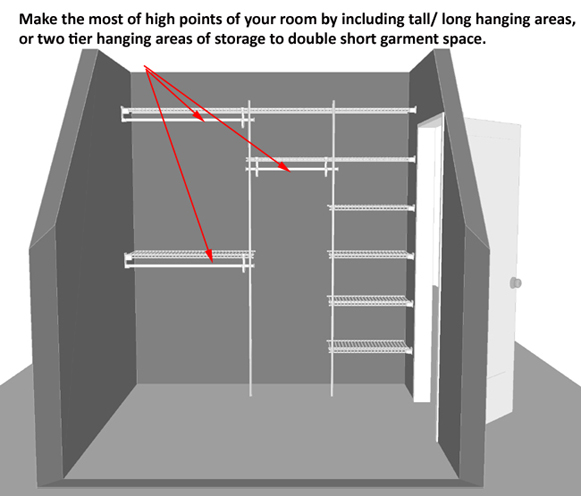
You may want some long hanging space, for dresses, overcoats, dressing gowns etc.
Do you need shelving for flat items/ folded garments / linens? Drawers for underwear? Maybe shoe racks.
Create your storage checklist and get started!
4) Armed with your dimensions and checklist, it's time to get planning!
Now that you know what you need to include, think about your walk in wardrobe logically and make sure that where there is height you take advantage of it, but don't waste space where height is an issue.
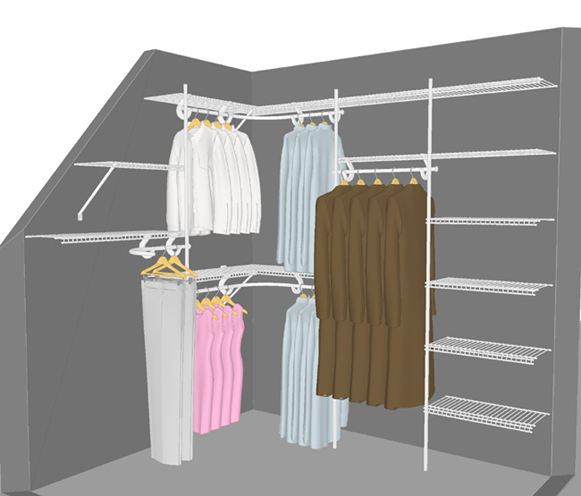
For example, if we start with the left hand side wall of our example room, this is a full height wall and you would therefore benefit from placing long hanging space here, as well as some two tier hanging.
As the return wall next to the door is quite short, immediately adjacent to the doorway, we have included a stack of shelving so that when entering your room, you are not confronted with your clothes.
Next to this we have then included a long hanging section with top shelves for added storage.
Alongside this, a two tier hanging section which connects to our SuperSlide corner hanger bar continuing the section around the corner onto the adjacent wall without interruption.
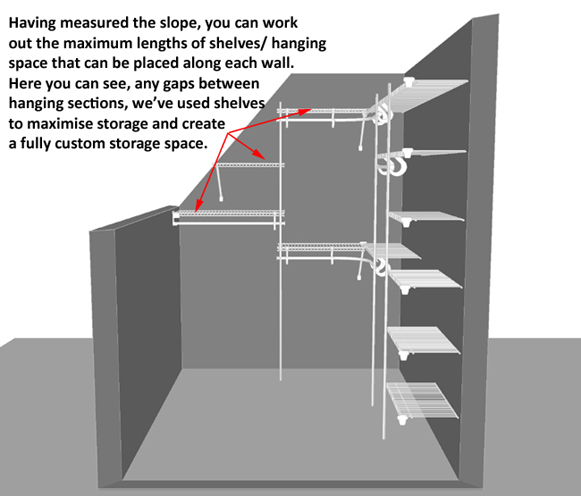
Work your way around the room. Having dealt with the tallest wall, now make a start on the wall where the slope intersects, in this example it would be the back wall.
Our two tier hanging section from the tall wall can continue around the corner onto the back wall, and make the most of the remaining full height section. Here's where your 1D template comes in handy. When creating two tier hanging space, the top shelf is usually placed at 2.13m/ 84" from the floor. Use your scale and find this point along the wall. At this position, measure the width and this will be the maximum width of any shelf placed at this level. See image below.
So in this example, the top shelf can be no more than 1.15m/ 45" wide. You can use this method to measure the height and position of each other shelf below this too. Keep in mind that we tend to allow approximately 35cm/ 14" between each shelf, to allow space for fixings. Obviously you can make the spacing greater, but you should have no less than 30.5cm/ 12" between shelves.
As we already had a two tier hanging section placed on the adjacent wall, the top and bottom shelves along this wall can butt up to it creating seamless storage around the corner.
We've then included a three quarter length hanging section to fit below the slope on the left hand side, and to bridge the gap(s) left by the restrictions of the slope, we've included a simple shelf for added storage space.
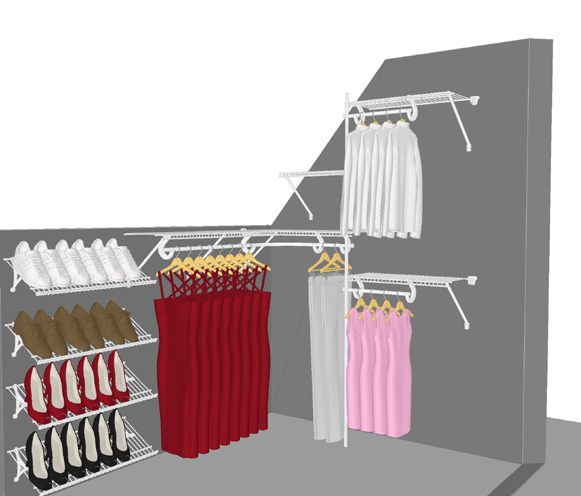
Now we move on to the shortest section of the wardrobe. Again you need to play to the strengths of the available space. Sometimes you may have enough height to have a long hanging section for dresses but not a two tier hanging section. Other times you'll have enough space simply for one level of short hanging space, or maybe even just shelving. But despite what it is you can store, you mustn't neglect the area just because it's shorter. Simply figure out what will fit in the area so that you can make the most of every available inch.
For the purpose of this tutorial, we are able to extend the three quarter length hanging section from the back wall around the corner using the SuperSlide corner hanger bar.
So that we don't cause an obstruction to the doorway, we have then stopped the hanging short, and in the remaining space included a stack of shoe shelves which won't protrude into the room as much as a hanging garment, giving enough room to enter the room and move around.

Now that we have completed the design, you can see how it would look and work as a completed walk in wardrobe.
Right Hand Side:
Left Hand Side:
To show you how this would work when it comes to ordering what you need, we have put together a parts list of required items needed for this design. You can use the links to be taken to the relevant pages on our website, if designing your own walk in wardrobe, or you can click here to see all parts and hardware you may need to create a walk in wardrobe.
Alternatively if you're not feeling confident enough, get in touch with our design team who will be more than happy to help you design your walk in wardrobe, whether you have sloping ceilings or not. Click here to fill out the design request form and a member of our team will get back to you shortly.
Note that for this design we used our 12" (30.5cm) deep SuperSlide shelving with our regular fix mounting system.
| Part # | Description | Qty | Unit Price £ | Image |
| 47198 | 2.44m / 8' length 30.5cm/ 12" deep SuperSlide shelving (Back wall above window) | 1 | 19.99 | 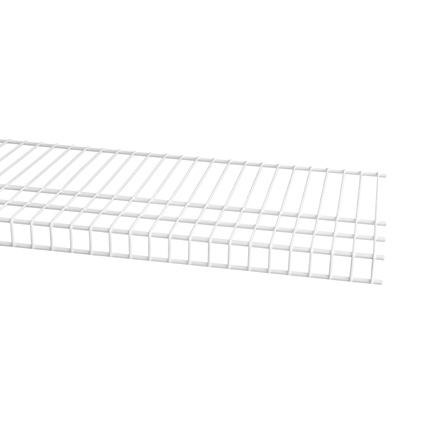 |
| 47196 | 1.83m / 6' length 30.5cm/ 12" deep SuperSlide shelving (Two tier hanging on Left hand side & top shelf on Right hand side wall) | 3 | 14.99 | |
| 47194 | 1.22m / 4' length 30.5cm/ 12" deep SuperSlide shelving (Two to be cut into 2 x 61cm / 2' shelves for left hand side wall shelving. One for long hanging section behind door, three for shoe racks below window, three for lower hanging sections on right hand side wall) | 7 | 9.99 | |
| 2056 | 0.91m / 3' length SuperSlide hang bar (Remainder of hanging sections) | 7 | 6.49 | 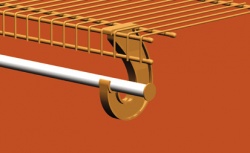 |
| 5649 | SuperSlide corner hanger bar. Only for use when you have a right angle corner. Connects between two regular lengths of SuperSlide hang bar. (Use between top tier of two tier hanging on left hand side wall, and long hanging behind the door) | 3 | 5.99 |  |
| 1164 | Shelf Support Bracket 30.5cm / 12" position. Use these at the end of any open shelf where shelf support poles are not used, or as supports at corners, or mid supports when a shelf is more than 91cm / 36" wide. | 6 | 2.49 | 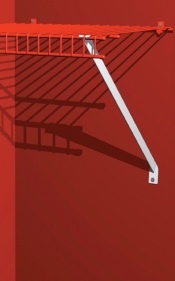 |
| 1009 | Shelf Support Pole. Use to support three or more shelves as an end support where no side wall is available to fix to, or as a mid support when shelves span more than 91cm / 36" wide. | 3 | 19.99 | 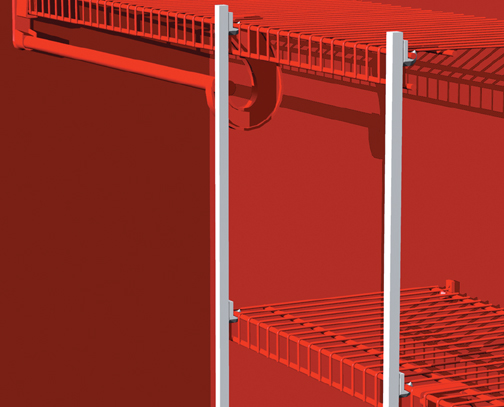 |
| 120 | Corner support bracket. Use to support the corners where two shelves at right angles butt up to one another. 1 Per join | 3 | 1.99 |  |
| 974 | Wall Bracket. Supports the end of a shelf only when fixing to available side wall. | 9 | 0.99 | 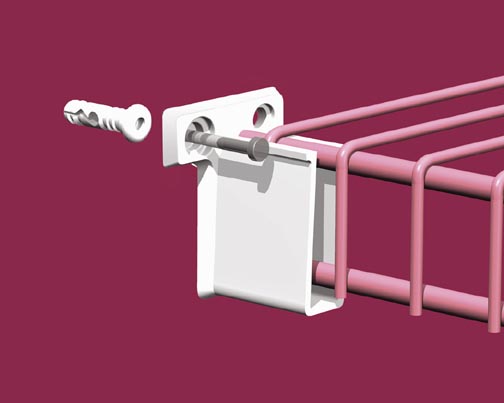 |
| 5647 | SuperSlide Hanger Bar Support. Use every 91cm / 36" along the length of a hang bar, as well as at each end where hang bar does not fix to a side wall, and either end of a SuperSlide corner hanger bar. | 14 | 1.59 |  |
| 2081 | SuperSlide Internal Hang Bar End Cap. For use at the end of hang bars which are "open ended" | 8 | 1.75 |  |
| 923 | Shoe Shelf Support. One required at each end of the shoe rack and every 91cm / 36" in between if required. | 8 | 2.49 |  |
| 203 | Small Plastic End Caps. These end caps finish off the shelving neatly, particularly when you need to trim shelves to your exact size. You will need 10 per shelf. | 160 | 0.06 | 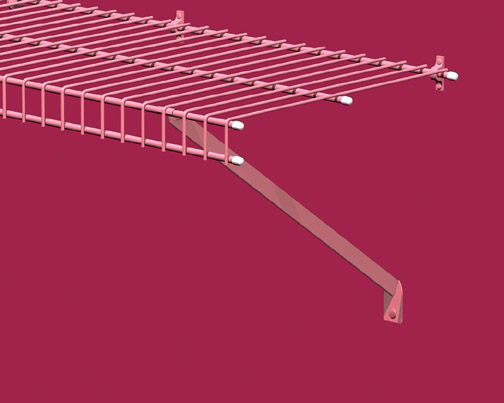 |
| 991 | Wall Clips. These are vital for fixing the shelf to the wall. You will need one at each end of the shelf, and then one approximately 25cm - 30cm / 10" - 12" apart in between. | 63 | 0.30 | 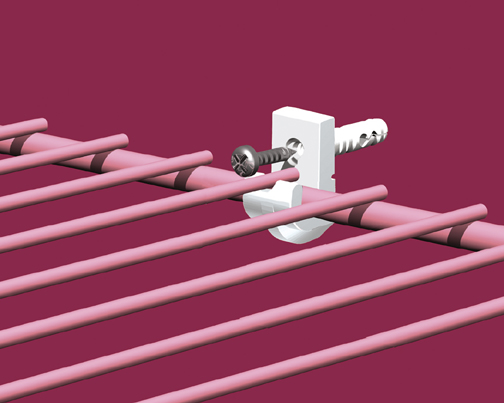 |
| Grand Total | £372.76 |


