How To Design A Wardrobe With Sloping CeilingsDesigning your own walk in wardrobe can be a daunting task, and when you throw sloping ceilings into the mix it becomes an even more challenging task! Here, we wanted to show you how to make the most of your room when you have obstacles such as low / sloping ceilings to overcome. This hopefully will give you the confidence to plan your own space and order a ClosetMaid system to suit your requirements, just like a pro! All you need to design your new walk in wardrobe, is a tape measure, a ruler, a piece of A4 paper, a pencil and an idea of how you'd like to use the space. | Step 1 - Measure your space - In the interest of keeping it simple, quite obviously you need to know how much space you've got to work with. So start by measuring the width and depth of your space, as well as any return walls either side of obstacles such as windows/ doors etc. - When working with a sloping ceiling, it's very important to get a good idea of the whole space rather than just the bits you'd like to use, as it can make a difference with fixings and position of shelves etc. even if you don't intend to place storage space on all walls. - For the purpose of this tutorial, our wardrobe is 1.83m/ 6' wide x 2.13m/ 7' deep. - To the left of the door there is a return of 59cm/ 23". To the right of the door there is a return of 47cm/ 18.5". | 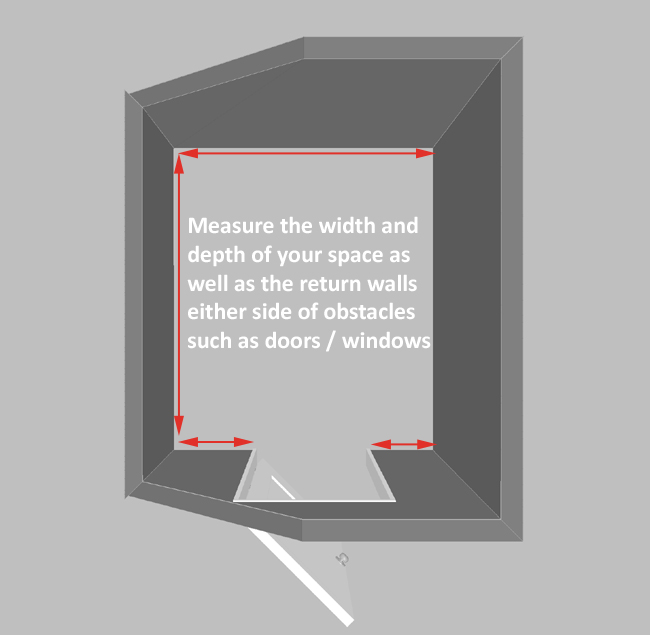 | | Step 2 - Measure the height and slope of your room - Now work out what you can sensibly fit into your room, whilst allowing for the slope in your ceiling. - ClosetMaid shelving needs to be installed onto flat/ perpendicular walls, so fixing to the actual slope is not possible. We can however design our closet to maximise the usable space. - Take your tape measure and measure the tallest point of the room, and the lowest point of the room. - You'll need to also measure the width of any flat area of the ceiling before the slope begins as shown in the diagram to the left. - This will allow you to work out the gradient of the slope. - For the purposes of this diagram we've shown a room which slopes to one side. Looking at the front wall/ wall with the door on it, the flat area of ceiling is 91cm/ 3' wide before it begins to fall away. - The highest point of the ceiling is 2.44m/ 8' and the lowest point is 1.37m/ 4'6" tall. | 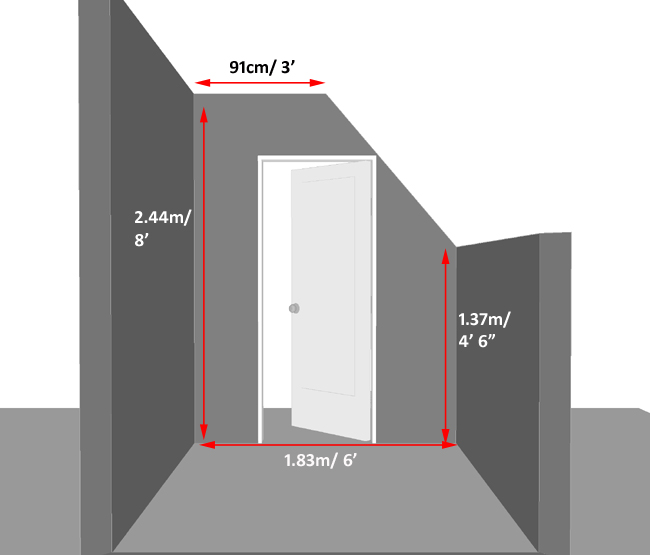 | | Step 3 - Plot out your awkward space - With an A4 piece of paper, pencil and ruler draw a 1D image of one of your walls where the slope intersects (i.e. in this example it would be the back wall). - Use a scale that will allow you to fit your drawing onto one sheet of paper and start by drawing the overall width of your room (this example it would 1.83m). Drawing it to scale will help you work out the maximum widths of each shelf when you come to design your closet. - Next draw the tallest side (this example would be 2.44m/ 8'), then draw the width of the flat ceiling (this example would be 91cm/ 3'). Then you need to draw the shortest side (this example would be 1.37m/ 4' 6") and lastly draw a straight line between the end of the flat section and the lowest point of your ceiling to indicate the slope. - You'll end up with a 1D image of one wall like the one shown to the right, which will act as a template when measuring where you would like to install shelving. This will help illustrate the maximum widths of each section. As long as your room slopes in only one direction, this will work for both sloping walls. Simply invert the the drawing for each side accordingly. |  | | Step 4 - Create your storage checklist - Who is the closet for? - Do you share it? - What are the storage needs of each person/ persons using the closet? - Do you hang most of your garments? - Do you require any space for items other than hanging garments? - Are your hanging items mainly short garments? - Do you require any long hanging space? If so, what is the length of your longest garment on it's hanger? - How much wardrobe space do you currently have? Measure the size of the space you already use, do you require more/ less space than you currently have? - Do you require drawer space? Or will you use bedside drawers/ chest of drawers situated in the main bedroom(s)? | Checklist - i.e. Male / Female? - i.e. With a partner/ your children? - i.e. Are you storing adult clothing/ children's clothing/ a mixture? - i.e. Do you prefer to fold some of your garments, or are you trying to avoid folding items? - i.e. Shoe storage/ hand bags/ luggage/ linen/ accessories? - i.e Blouses/ tops/ skirts/ shorts/ trousers hung over a hanger? - i.e. for dresses/ overcoats/ suits? Are your longest garments no more than 142cm/ 56" long on a hanger? If so you can include additional shelving above for flat/ folded items. - Is the purpose of the new wardrobe to consolidate what you have used previously? Have your needs changed and you now need more storage space for yourself or because you are now sharing the closet? - Drawers are helpful for items such as underwear or belts and ties. Would you like to include some drawers in your closet? You can use ClosetMaid drawers, or leave space for your own drawers? | | Step 5 - Get planning - Now that you know what you need to include, think about your walk in wardrobe logically and make sure that where there is height you take advantage of it, and where height is limited you don't waste space. - In our example we show the right hand side wall as you enter the room. This is the full height wall before the room starts to slope. Therefore it's ideal for placing two tier hanging space and long hanging space where the height is available. - As the return wall adjacent to the door is quite short, we have included a shelf stack immediately on your right as you enter the space so that hanging garment wont protrude across the door way every time you try to walk in to the room. - Next to this we have then included a long hanging section for dresses and overcoats, with an additional shelf above. - Toward the back of the room, we have then included a two tier hanging section for short garments such as blouses, tops, shirts, jackets etc. - We have included a top shelf all the way along the width of the wall. The top rail in the two tier section is added to this shelf, but the rest of the shelf is useful for storing items such as linens, luggage, bags etc. which don't need to be accessed regularly. | 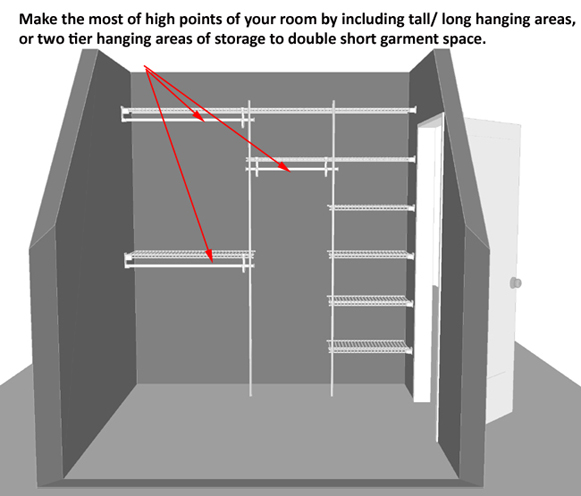 | | Step 6 - Work your way around the room - Now you have your starting point, work your way around the room, and plot how you will utilise the rest of your space, taking into account the slope. - Go back to the template that you created earlier and use this to figure out what will fit along the back wall. - The way that we drew the template, this actually means that for the back wall this template should be inverted, but it's absolutely find to go ahead and use it to measure and plan what you can place where. - So take a ruler and work out using the same scale that you used to draw the template where 2.13m/ 84" from the floor would be on your plan. - Next, at the point where you have just discovered where 2.13m/ 84" is, draw a straight and level line along the width of the available wall, and measure the length of the line. Use your scale to work out what this measurement is in real terms. For our example it means that the measurement is 1.15m/ 45" as shown in the diagram to the right. - This means your top shelf from the right hand side wall that we drew earlier can continue around the corner onto the back wall at this same height to provide additional storage or hanging space. - Remember the top shelf on the right hand side wall has already been decided, so you will need to take off approximately 33cm/ 13" from the 1.15m/ 45" measurement that you've just worked out. This way, your new shelf along the back wall will butt up to the existing shelf now placed on the right hand wall. | 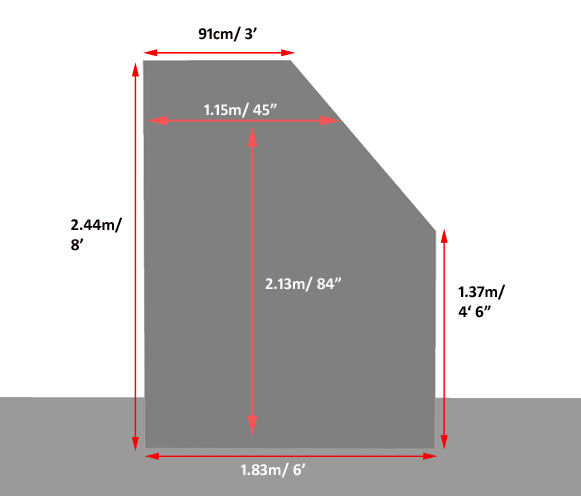
| | Step 6 - Work your way around the room (cont'd) - Now that you have worked out the width of your next shelf, you can continue to decide what else you can place along the rest of the wall. - In this example we have decided to again make the most of the available height before the ceiling slopes, so we have continued the two tier hanging section around the corner for further short garments. - Beside this we have then included a small section for three quarter length garments such as long skirts, trousers hung at the waist, long jackets, suits etc. We can then also fit a couple of additional shelves for flat and folded items. - We have supported the mid point with a shelf support pole which free stands on the floor and clips to the front edge of the shelving. This provides strength and support but also acts as a bit of a divider between sections. | 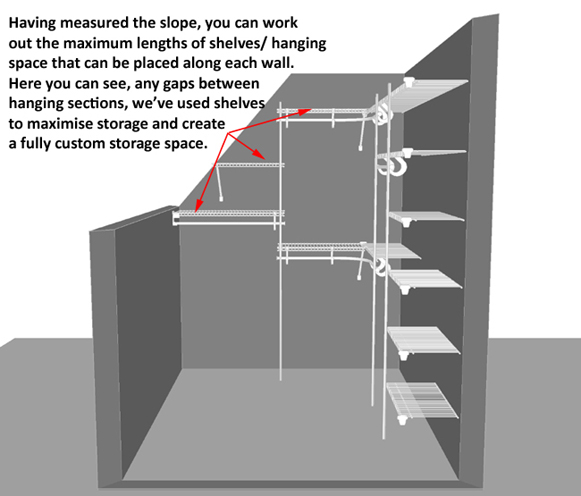 | | Step 6 - Work your way around the room (cont'd) Now we move on to the shortest section of the wardrobe. Again you need to play to the strengths of the available space. Sometimes you may have enough height to have a long hanging section for dresses but not a two tier hanging section. Other times you'll have enough space simply for one level of short hanging space, or maybe even just shelving. But despite what it is you can store, you mustn't neglect the area just because it's shorter. Simply figure out what will fit in the area so that you can make the most of every available inch.
For the purpose of this tutorial, we are able to extend the three quarter length hanging section from the back wall around the corner using the SuperSlide corner hanger bar.
So that we don't cause an obstruction to the doorway, we have then stopped the hanging short, and in the remaining space included a stack of shoe shelves which won't protrude into the room as much as a hanging garment, giving enough room to enter the room and move around. | 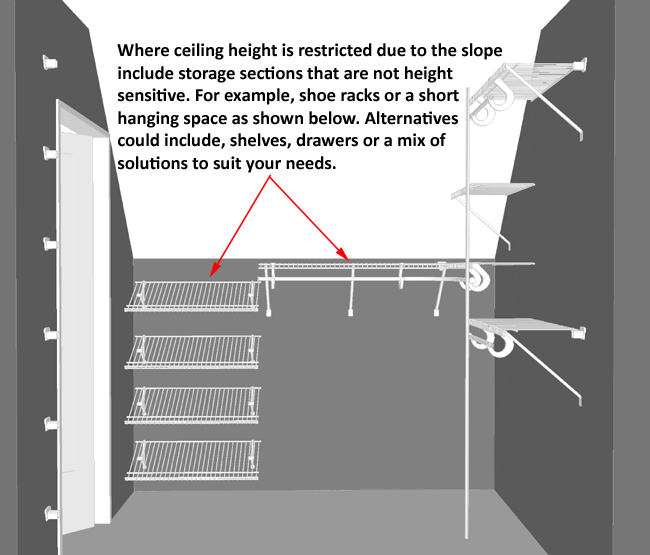 | | | | | Right hand side | Left hand side | 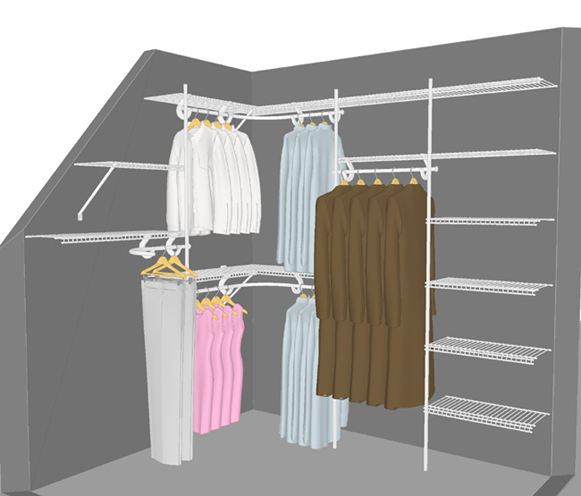 | 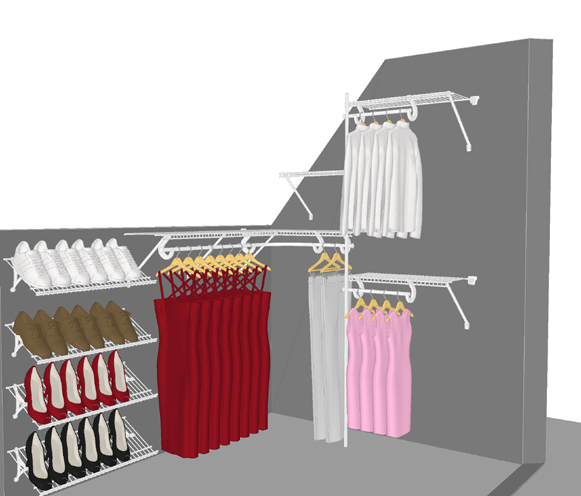 | To show you how this would work when it comes to ordering what you need, we have put together a parts list of required items needed for this design. You can use the links to be taken to the relevant pages on our website, if designing your own walk in wardrobe, or you can click here to see all parts and hardware you may need to create a walk in wardrobe. Alternatively if you're not feeling confident enough, get in touch with our design team who will be more than happy to help you design your walk in wardrobe, whether you have sloping ceilings or not. Click here to fill out the design request form and a member of our team will get back to you shortly. Note that for this design we used our 12" (30.5cm) deep SuperSlide shelving with our regular fix mounting system. | Part # | Description | Qty | Unit Price £ | Image | | 47198 | 2.44m / 8' length 30.5cm/ 12" deep SuperSlide shelving (Back wall above window) | 1 | 19.99 | 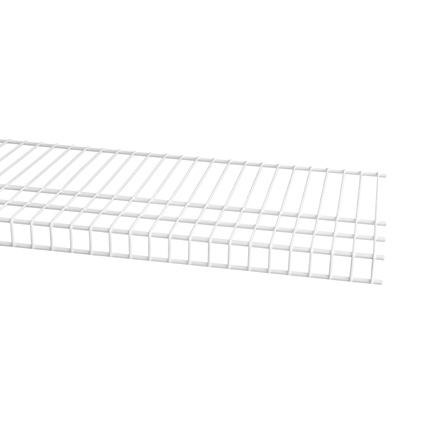 | | 47196 | 1.83m / 6' length 30.5cm/ 12" deep SuperSlide shelving (Two tier hanging on Left hand side & top shelf on Right hand side wall) | 3 | 14.99 | | | 47194 | 1.22m / 4' length 30.5cm/ 12" deep SuperSlide shelving (Two to be cut into 2 x 61cm / 2' shelves for left hand side wall shelving. One for long hanging section behind door, three for shoe racks below window, three for lower hanging sections on right hand side wall) | 7 | 9.99 | | | 2056 | 0.91m / 3' length SuperSlide hang bar (Remainder of hanging sections) | 7 | 6.49 | 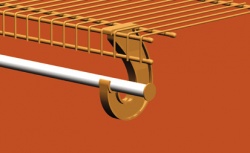 | | 5649 | SuperSlide corner hanger bar. Only for use when you have a right angle corner. Connects between two regular lengths of SuperSlide hang bar. (Use between top tier of two tier hanging on left hand side wall, and long hanging behind the door) | 3 | 5.99 |  | | 1164 | Shelf Support Bracket 30.5cm / 12" position. Use these at the end of any open shelf where shelf support poles are not used, or as supports at corners, or mid supports when a shelf is more than 91cm / 36" wide. | 6 | 2.49 | 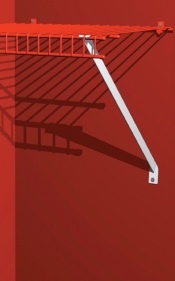 | | 1009 | Shelf Support Pole. Use to support three or more shelves as an end support where no side wall is available to fix to, or as a mid support when shelves span more than 91cm / 36" wide. | 3 | 19.99 | 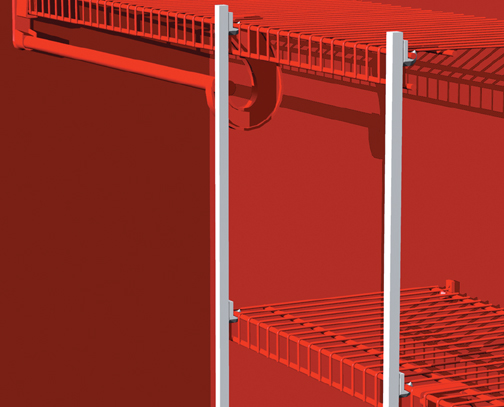 | | 120 | Corner support bracket. Use to support the corners where two shelves at right angles butt up to one another. 1 Per join | 3 | 1.99 |  | | 974 | Wall Bracket. Supports the end of a shelf only when fixing to available side wall. | 9 | 0.99 | 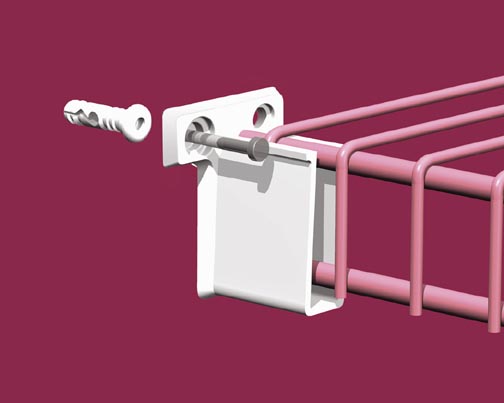 | | 5647 | SuperSlide Hanger Bar Support. Use every 91cm / 36" along the length of a hang bar, as well as at each end where hang bar does not fix to a side wall, and either end of a SuperSlide corner hanger bar. | 14 | 1.59 |  | | 2081 | SuperSlide Internal Hang Bar End Cap. For use at the end of hang bars which are "open ended" | 8 | 1.75 |  | | 923 | Shoe Shelf Support. One required at each end of the shoe rack and every 91cm / 36" in between if required. | 8 | 2.49 |  | | 203 | Small Plastic End Caps. These end caps finish off the shelving neatly, particularly when you need to trim shelves to your exact size. You will need 10 per shelf. | 160 | 0.06 | 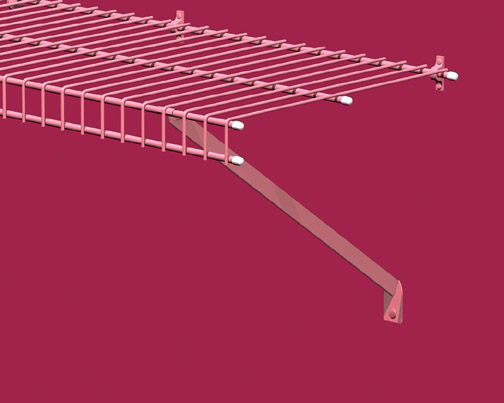 | | 991 | Wall Clips. These are vital for fixing the shelf to the wall. You will need one at each end of the shelf, and then one approximately 25cm - 30cm / 10" - 12" apart in between. | 63 | 0.30 | 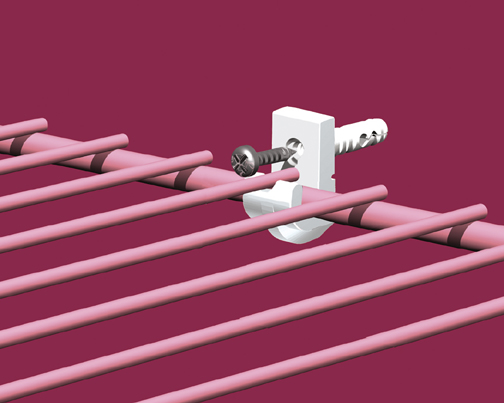 | | Grand Total | £372.76 | |